If you’re looking for a fast and portable way to play retro games directly from a USB drive, Batocera is one of the best options available. It allows you to turn any PC into a retro gaming console with just a few simple steps — no installation required on your main system.

💡 Note: Another great alternative is RetroPie, which is ideal for installing on a Raspberry Pi or a Linux-based system like Ubuntu.
Watch (Video): Booting and Playing Batocera from USB
To see how easy it is to boot Batocera from a USB drive and start playing retro games, check out this quick video:
In this video, we show:
- Booting directly from the USB
- Navigating Batocera menu
- Launching a game
How to install Batocera step to step
Technical requirements:
- PC or laptop: Thinkpad t480 i5 8GBRAM
- USB drive 8GB is ok but i recommend more (for put a many games)
Step 1: Install Raspberry Pi Imager
We need to download the bootloader software named:
Raspberry Pi Imager download or just install in your SO
favorite (windows or Linux). Simple command on your ubuntu:
sudo apt install rpi-imagerOr go to: https://www.raspberrypi.com/software/

Step 2: Download batocera
Download Batocera on the oficial web site: https://batocera.org/download I need to install it on my PC. If you need install on another kind of device, choose the right option for you

Step 3: Boot batocera on USB
Open the
rpi-imagerClick
Operating Systemand selectUse customafter then choose the filebatocera-file.img.gzClick
Choose storageand select yourusb drive/SD/Hard-driveClick Next
- Woul you like to apply OS customization setting? set
NO - ⚠️ All existing data on the drive will be destroyed! set
YES
- Woul you like to apply OS customization setting? set
This process take a time, just wait patiently to finish


Note: If you need more detail about this process, including many step-by-step screenshots, please visit the Installation Guide
Step 4: Boot the USB drive on your PC
This step is the most simple just insert the usb on the PC and press
the commons shortcut to enter the menu selection: F10,
F11, F12. In my case was F12
(many times) and select boot from the USB.

This step is necessary To install batocera in USB that process create documents and directories into the USB useful for afterward put owers bios, roms o games
If not work disable or enable UEFI and try again
Step 5: Where and how Install games into the USB
On your desktop available windows or linux on your network
- Download the games from internet: https://vimm.net/vault Just dowload your favorites.
Example: Link direct of the game Super Mario World

- Now we need to know the main directories for to upload owner games:
bios: Here we found files for startup a some consoles likewiiand anothers.roms: Here we found the all consoles available to play some of them are:snes: super nintendopsx: PlayStation 1ps2: PlayStation 2wii: Wii
Copy and Paste the games
3.1 By Network: on PC RETRO-GAME en connected yourseflt network
The easy way to access is my
SMB:smb://192.168.1.38/share/bios/ smb://192.168.1.38/share/roms/ smb://192.168.1.38/share/roms/snes/ # Here put all games for super nintendo3.2 Simple put the USB with batocera installed and put the games Here just only need to copy and paste in the directories:
 - `/share/bios/`
 - `/share/roms/`: there put the gammes according each console
Step 6: Update list of game of batocera for begin to game
- After put all games that you want, just need to update the game list to begin.
- Press
select or spaceof your computer - Option
Game Settings>Update Game List>Yes - And now just wait a little and looks all games was loaded

Tricks 1: Shortcut into the Game
This is my controller (looks like PS1 one). Yours might be different, so use the image to match the shortcuts to your own controller.
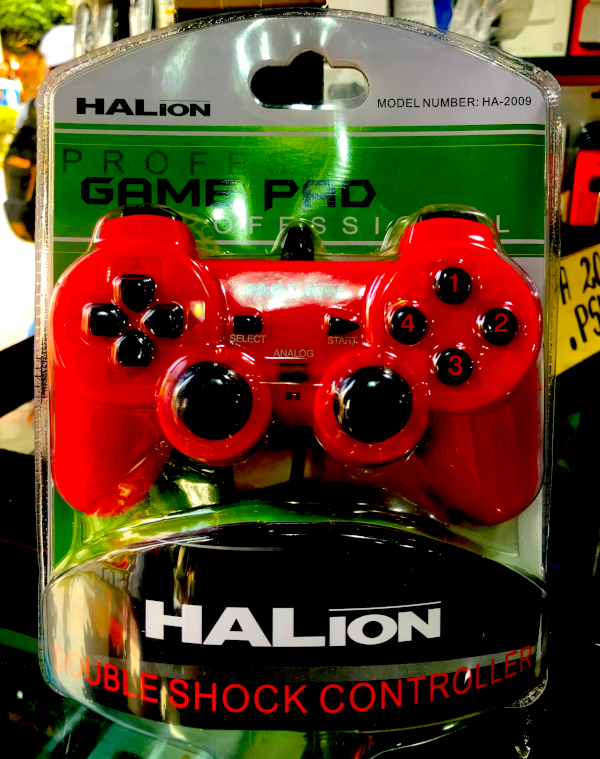
There are shortcuts available in the Batocera console like:
SELECT + 4  # save the current instant of the game
SELECT + 1  # recover or back the instant game
The official documentation mension this just i put there if help you:
The following options are available while in-game:

Enter RetroArch Menu – Many of the emulators/cores utilize RetroArch. To enter the RetroArch menu press SELECT+A.
Change current State – SELECT + DPAD UP/DOWN.
Save current State – SELECT + X.
Load current State – SELECT + Y.
Insert Arcade Credit – In an Arcade game, press SELECT to insert a credit.
Start Arcade Game – In an Arcade game, press START to start a 1 player game.
Change Shader – SELECT + R2/L2.
Screenshot – SELECT + L1.
Tricks 2: Access to Batocera on the local network
By default we can access by SAMBA protocol. Your PC Must
be connect by an internet cable.
smb://192.168.1.38/Share/roms/snes/
smb://BATOCERA/Share/roms/snes/192.168.1.38: is the IP local of the Batocera PCBATOCERA: is the host name of the Batocera PC
By both directions is accesible the batocera
Note: You can also use WI-FI, but it’s a bit more complicated and would take longer.
Conclusion
Batocera is a powerful and easy-to-use solution for anyone who wants to enjoy retro games on an old PC or directly from USB drive. With just a few simple steps you can bring your favorite childhood. This was my manual for not forget how to install my custom retro-game step to step, what do you think.
No hay comentarios:
Publicar un comentario